Export a Native IPA for Apple
Get your Creator app ready to submit directly to the app stores
This guide will take you from start to finish, and give you everything you need to end up with an IPA file ready for submission to the Apple App Store.
1. Create An Apple Developer Account
You will need to create an Apple Developer Account if you do not already have one.
If you already have an Apple Developer Account, you can skip this step.
Additionally, if you already have your iOS provisioning profile and certificate, then you can skip to STEP 7.
2. Create/Register an App ID In Your Apple Developer Account
First, log into your Apple Developer Account.
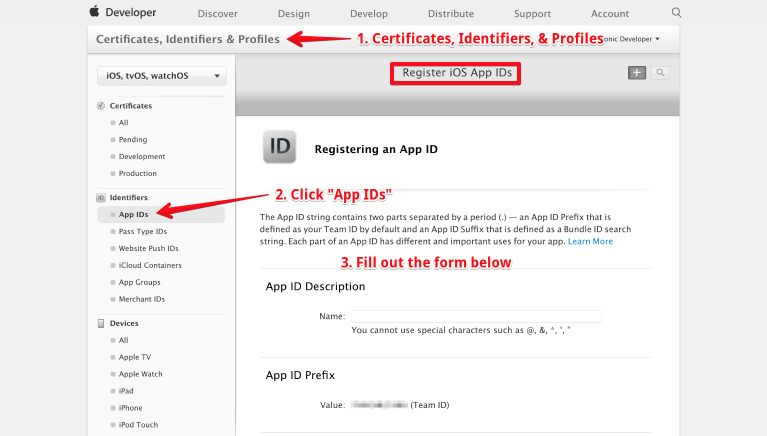
Next, navigate to Certificates, Identifiers, and Profiles and click on App IDs in the left-side menu.
Important
When filling out the form, under Explicit App ID, make a note of what you enter here. You will need it again later in this guide. iOS Bundle IDs are represented as a "reversed address," such as com.ionicframework.MyIonicApp. You can name this anything, such as com.whatever.MyApp.
3a. Generate a Certificate Signing Request File
Now, you need to generate a certificate signing request file.
The Following is for Mac Users Only
If you are on a different platform such as Windows or Linux, then skip this step and follow step 3b below instead.
If you are using a Mac, perform the following:
- Open Keychain Access, which is in the Utilities folder of your Applications folder.
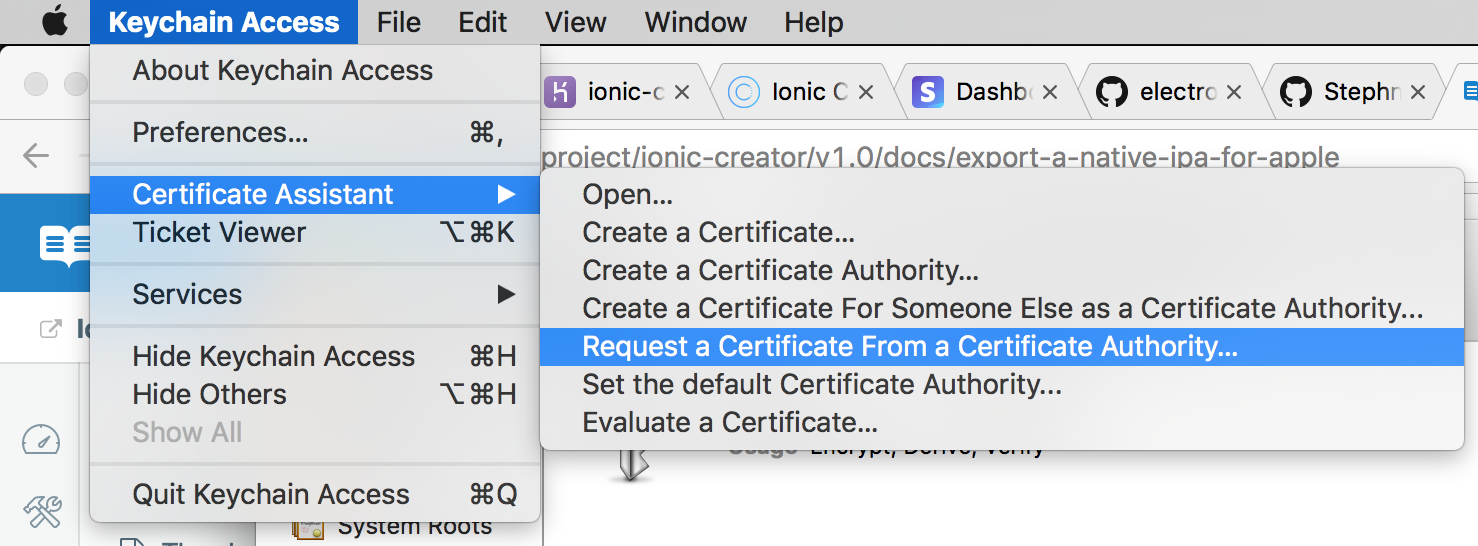
- Navigate to Certificate Assistant › Request a Certificate From a Certificate Authority
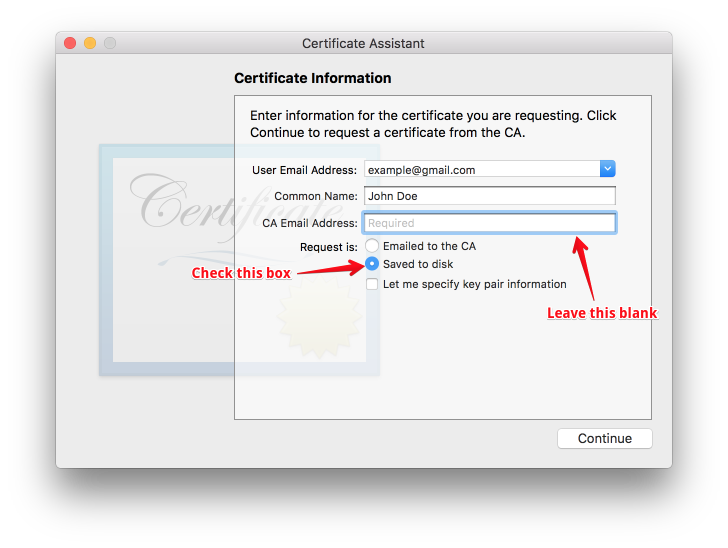
- Fill out the form using your real name and e-mail address. Make sure to leave the CA Email Address box blank, and check the box Save to Disk.
3b. Generate a Certificate Signing Request File
For non-Mac users, here is how you can generate a Certificate Signing Request File:
- Windows users will first need to download OpenSSL. Linux users already have OpenSSL installed by default.
- Generate a private RSA Key File with the following command from the command line or terminal:
Windows users: cd C:\OpenSSL-Win64\bin & openssl genrsa -out keyname.key 2048
Linux users: openssl genrsa -out keyname.key 2048
- Create the certificate signing request file with the following command:
openssl req -new -key keyname.key -out CertificateSigningRequest.certSigningRequest
Save Your RSA Key File
Make sure to save BOTH files: keyname.key and CertificateSigningRequest.certSigningRequest. You can name these files whatever you'd like.
4. iOS App Certificate
First, log into your Apple Developer Account.
Next, navigate to Certificates, Identifiers, and Profiles and click on Development, under Certificates in the left-side menu.
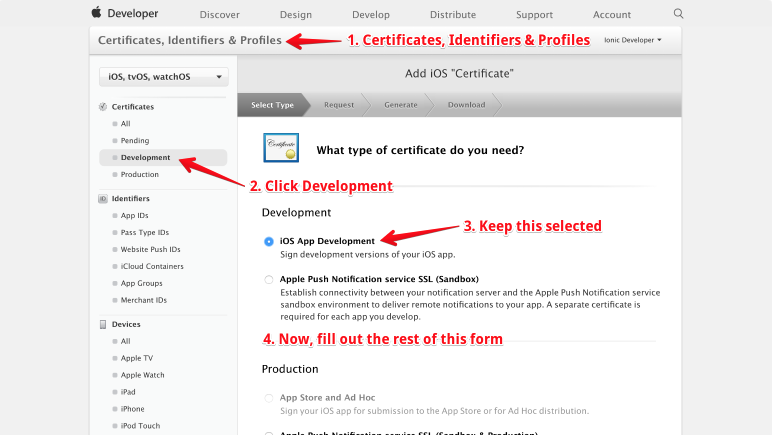
Finally, when prompted -- upload the .certSigningRequest file you created from STEP 3 above.
Lastly, download your certificate. It should be a .cer file.
Development vs. Production
The steps above describe how to create a development certificate. You can create a production certificate (for submission to the app store) by choosing production instead.
5a. Convert the Certificate to a P12 File
Now we need to convert our certificate file from the previous step, into a .p12 file.
The Following is For Mac Users Only
If you are on a different platform such as Windows or Linux, then skip this step and follow step 5b below instead.
- Open Keychain Access, and drag your .cer file from STEP 4 into your login keychain. Then right click on it, and choose Export.
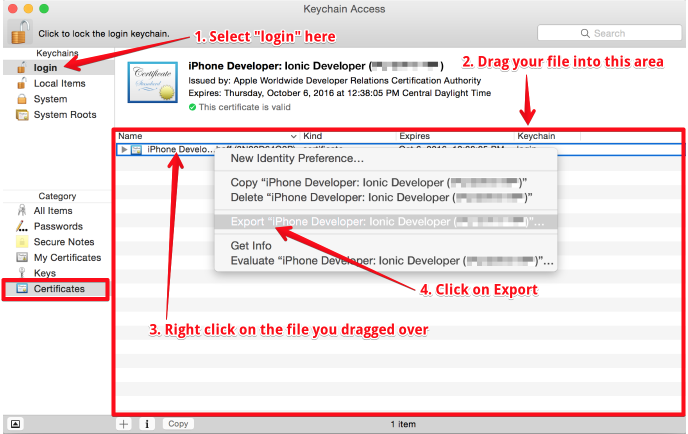
- Make sure to select Personal Information Exchange (.p12) for File Format when you export.
- Save the certificate, using a strong password.
5b. Convert the Certificate to a P12 File
For non-Mac users, here is how you can convert your certificate from STEP 4 to a P12 file:
-
Put keyname.key, (from STEP 3 of this guide) in the same directory as the .cer file you downloaded from Apple** (from STEP 4 of this guide).
-
Run the following commands from a command line or terminal:
openssl x509 -inform DER -outform PEM -in ios_development.cer -out ios_development.cer.pem
openssl pkcs12 -export -inkey keyname.key -in ios_development.cer.pem -out Certificates.p12
Filenames
In the two commands above, make sure to double check that you are using the correct filenames.
6. Create A Provisioning Profile
Provisioning profiles give your app access to be installed, or provisioned, on specific devices. For iOS App Development provisioning profiles, devices are selected manually.
First, navigate to Certificates, Identifiers & Profiles › Provisioning Profiles › Development in the Apple Developer Center and create a new provisioning profile.
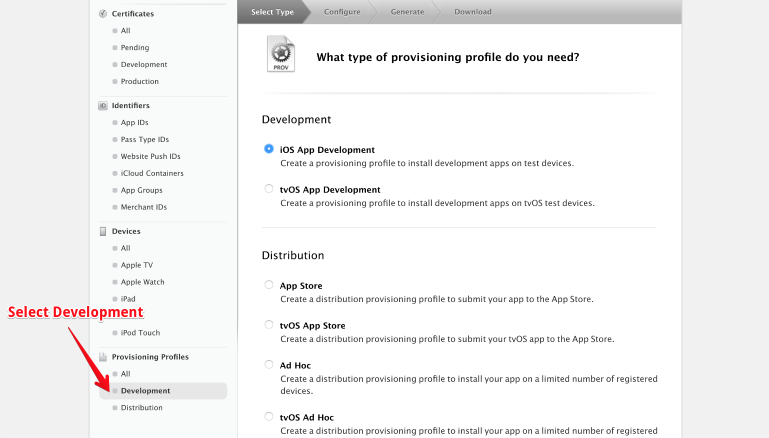
- Under Development, select iOS App Development
- Select the correct App ID (the same App ID you created in STEP 2 of this guide)
- Select the .p12 certificate you generated in STEP 5 (it should be named Certificates.p12).
- Select any and all development devices.
- Download the .mobileprovision file, which is your provisioning profile file.
Development vs Distribution
The steps above describe how to create a development provisioning profile. You can create a distribution provisioning profile (for submission to the app store) by choosing distribution instead. Your .p12 certificate will also need to have been created as a production certificate in STEP 4.
7. Export Your App From Creator
Now that you've generated both a certificate and a provisioning profile, you are ready to export your app from Creator.
First, open the Export popup:

Next, click on Package and follow these step:
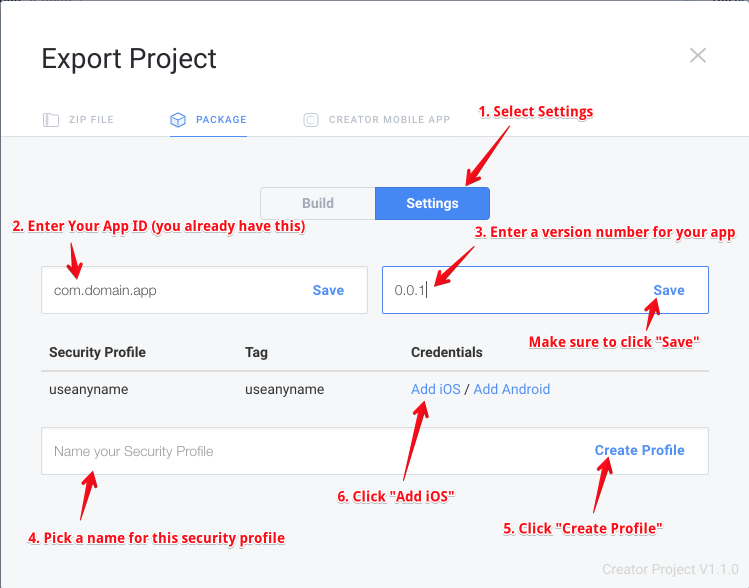
- Select the Settings tab
- Enter the App ID you used earlier in this guide
- Choose a version number, for example 0.0.1
- Enter a name for your Security Profile. This can be anything, such as "development" or "production".
- Click on Create Profile
- Click on "Add iOS" to add your iOS credentials you previously generated
Development vs. Production Security Profile
You will need to create separate security profiles for development and production. Profiles created with development credentials can be used to package Debug Builds. Profiles created with production credentials can be used to package Release Builds.
Now, simply upload the .p12 certificate from STEP 5, and provisioning profile you already generated from STEP 6:
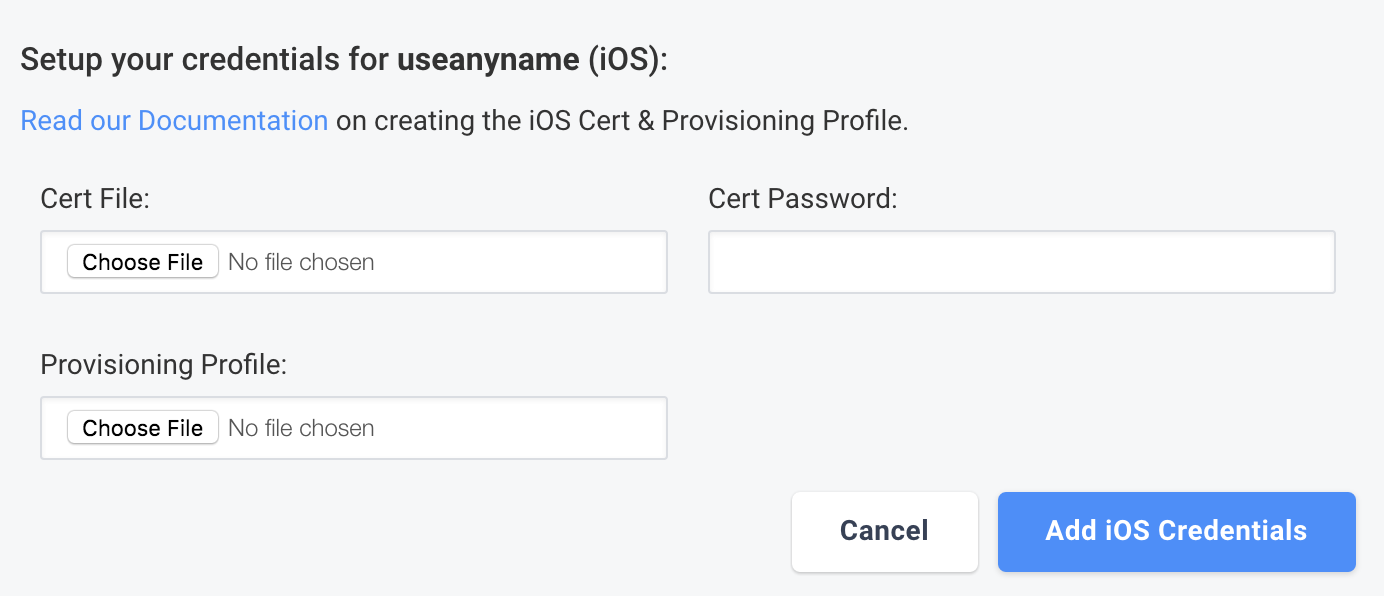
Be sure to enter your certificate password from STEP 5, and click the big blue "Add iOS Credentials" button.
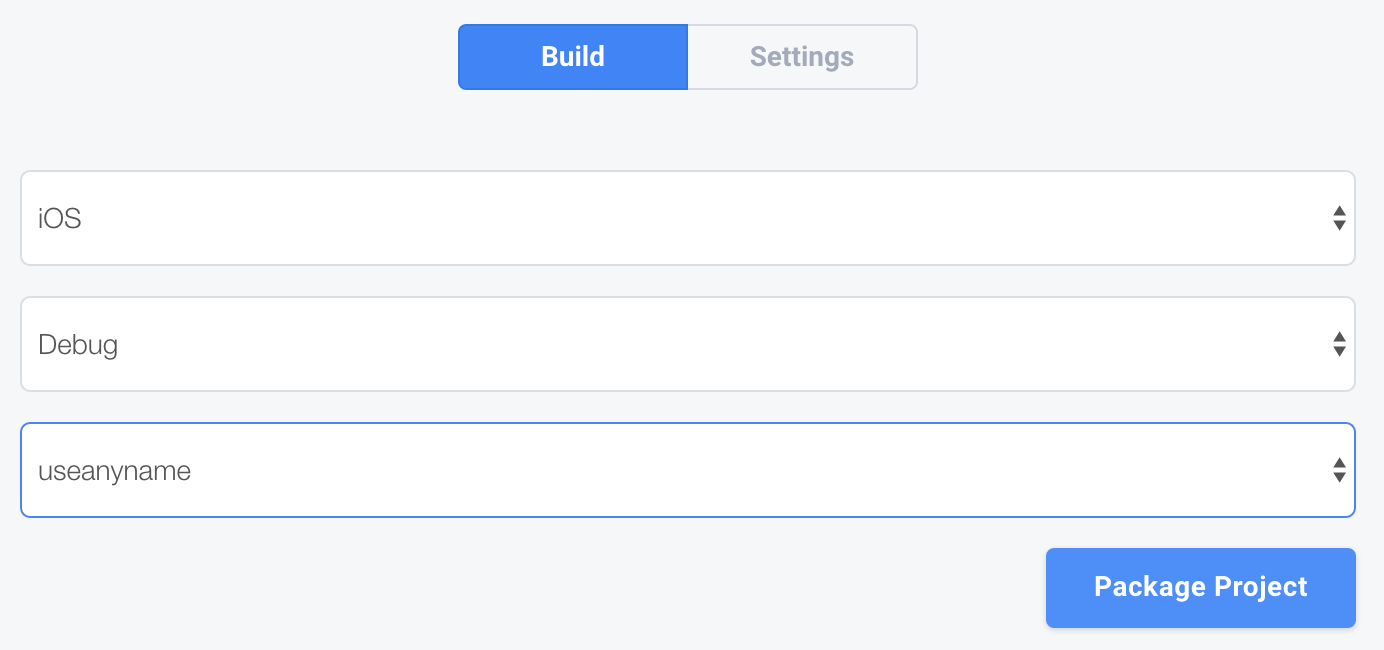
Now you're ready to finally export your app. Click on the "Build" tab of the Export popup.
- Select iOS as your platform.
- Choose either Debug (for development and testing) or Release (to submit your app to the app store).
- Choose the corresponding security profile for either Debug or Release.
- Click "Package Project" and your IPA file will be e-mailed to you.
8. Some Common Mistakes
Using the wrong App ID
Always use the same App ID you created in STEP 2 of this guide. It is used again in STEP 6 and STEP 7.
Wrong Build Type
Starting with STEP 3 of this guide, you will need to decide whether you are creating either development or production credentials.
If you are using development credentials, then select "Debug" when choosing the build type in Creator. If you are using production credentials, then select "Release" when choosing the build type in Creator.
If you have already created either a development or production set of credentials, then you will need to start over from STEP 3 again, in order to create a second set of credentials.
Updated less than a minute ago
