Directives
Directives are an important concept for any AngularJS app (see the Angular Docs). Directives let you make the components on your screen become dynamic, tied to data, repeat elements, and much more.
Long story short: directives will turn your app into a real functioning app.
A Directive allows you to extend a piece of HTML with additional information or functionality. While you might have an:
<ion-item>List Item</ion-item>
That Item becomes much different when you change it to:
<ion-item ng-repeat="item in items">{{item.name}}</ion-item>.
A simple ng-repeat allowed us to turn this into a complete list of items showcasing their names.
Using Directives in Creator
Adding a directive to a component in Creator is easy! In the right-side properties panel of any component (including pages), you just click "+ Add". Enter your directive name and directive value.
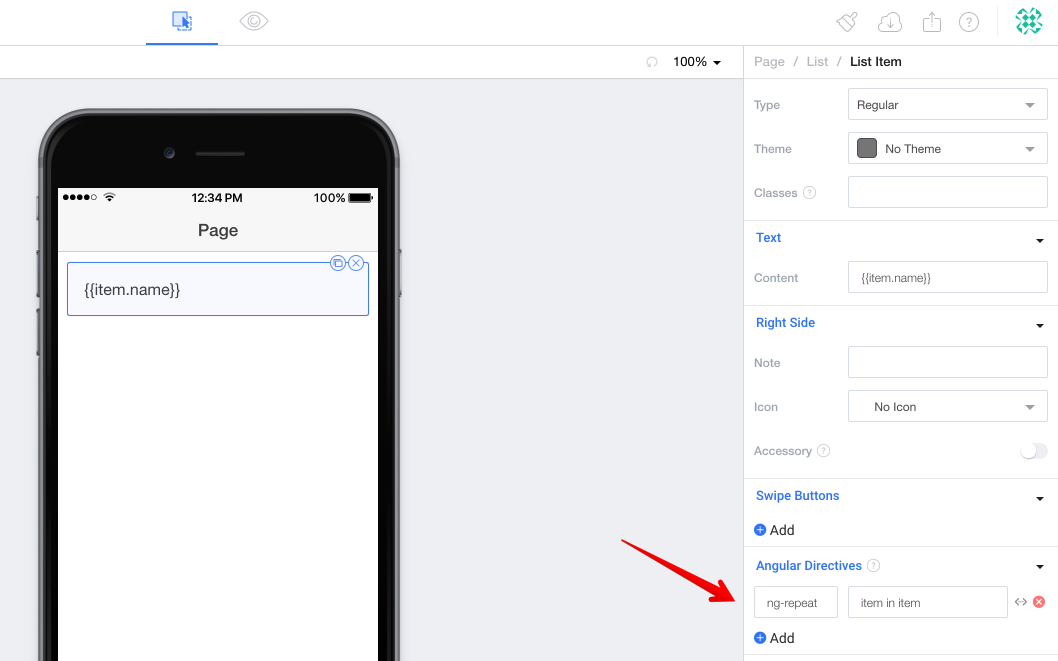
Every component in Creator has this Angular Directives property that you can modify, and you can add any built in Angular Directive or even custom directives you've added to your code.
To remove a directive, click on the red "x".
Using directives in HTML pages
For full control of your page templates, editing HTML and using directives works exactly how you'd expect in a standard local Ionic / Angular app, you will not use Properties to add directives. You can read more about HTML pages here.
My directive isn't on the right part of the component!
Sometimes you need a directive to be on a specific part of the Component, like adding an
ng-clickto a Header Button. Keep reading to learn how to move directives!
Moving a Directive
To change which part of a Component the directive is added to, all you have to do is click the <...> button to bring up the Directive Placement modal. Here we are adding an ng-click to a List Item Swipe Button:
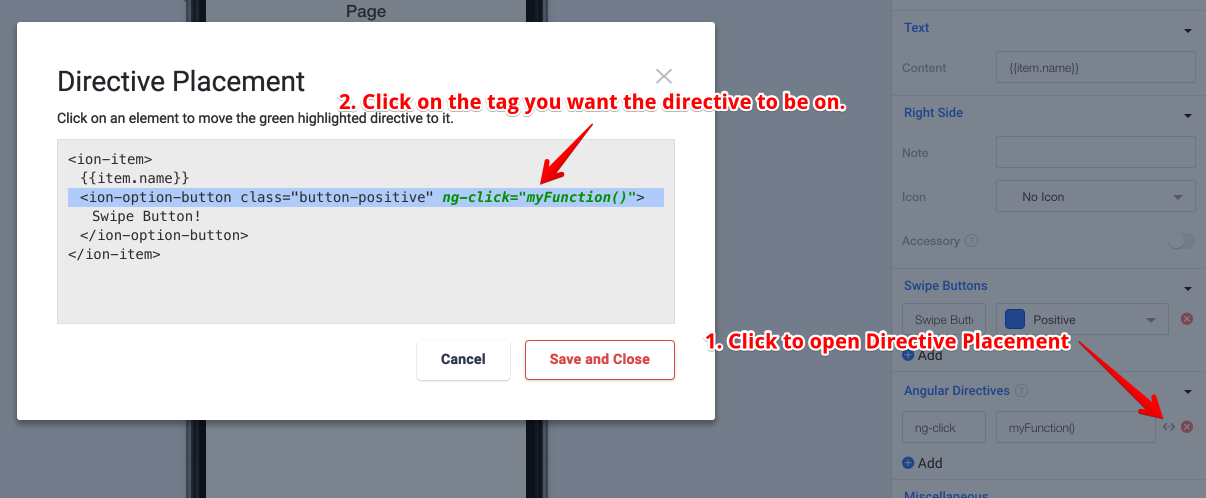
The tag that you've moved the Directive to will highlight blue, and you'll see the current directive you're moving in green.
A good tutorial to watch illustrating directives and how to move them is our Buttons in Headers tutorial. 👍
If you keep reading, we'll show you various common built in Angular Directives that you'll find yourself using.
These are not all of the directives
These are just examples for directives that you'll find yourself using. 👍 There are a ton of directives that we're not going to go over, and you can even write your own!
Binding to Data with ng-model
ng-model allows you to attach a $scope variable to an input in your app. This can work with Toggles, inputs, select options, etc. With the following Controller code:
$scope.data = {
  'name': 'Frank'
}
Set ng-model: data.name on your Component. That will associate what is typed in the input with the actual $scope variable.
First, put an ng-model on a Text Input, and then add a Paragraph component that displays the value {{data.name}}:
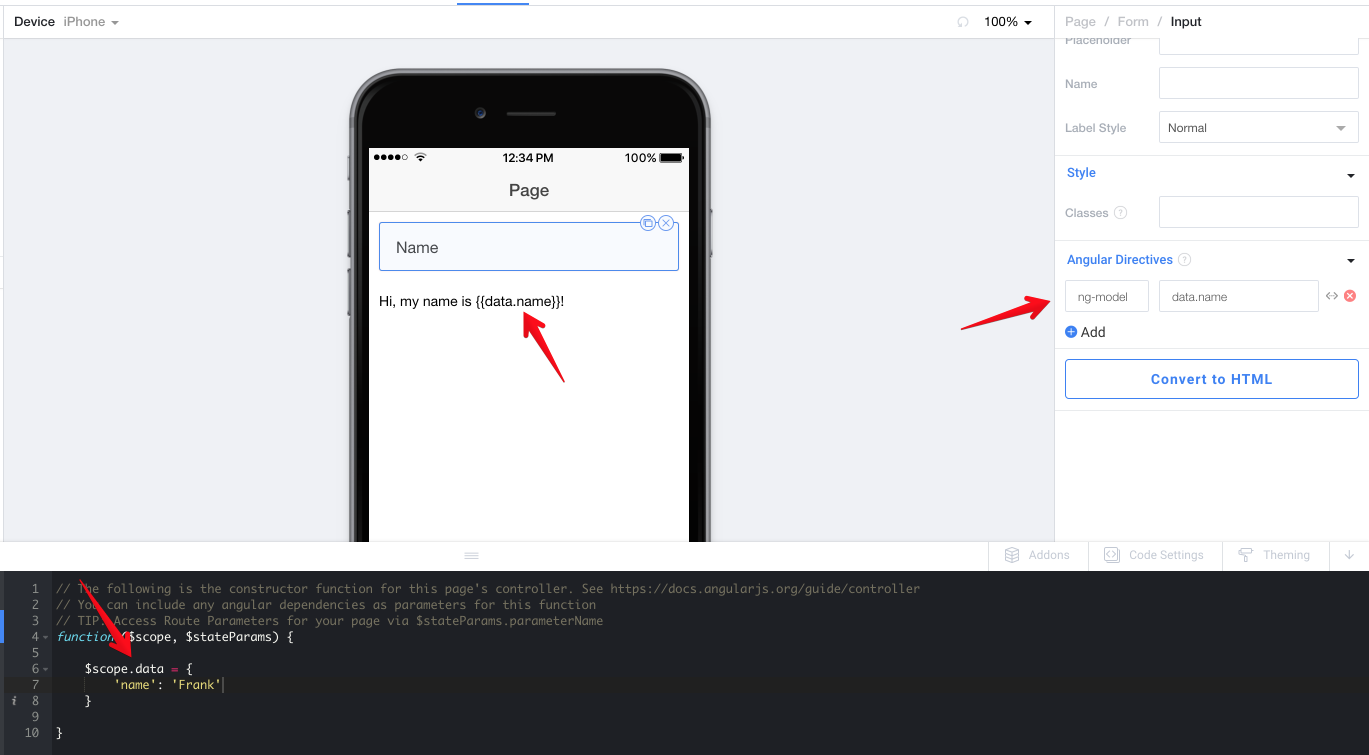
Here is the result that will be displayed after changing the text in the input:

While Creator intelligently makes sure that your ng-model is actually on an input, you may want to make sure by clicking on the <...> button that your ng-model is indeed on an input.
Watching data change with ng-change
Sometimes you might find yourself wanting to call a function whenever the ng-model for your input changes. While you can do this with a $scope.watch you can also do it with the ng-change directive if you prefer.
For instance, continuing with the ng-model Name example from above, we can add a JavaScript alert whenever the name changes (obviously this is a horrible idea, but you get the point 😎)
$scope.data = {
  'name': 'Frank'
}

$scope.nameChanged = function(){
	alert("My name was changed to "+$scope.data.name);
}
Then set ng-change: nameChanged() on your Component, notice that we included the () so it actually calls the function!
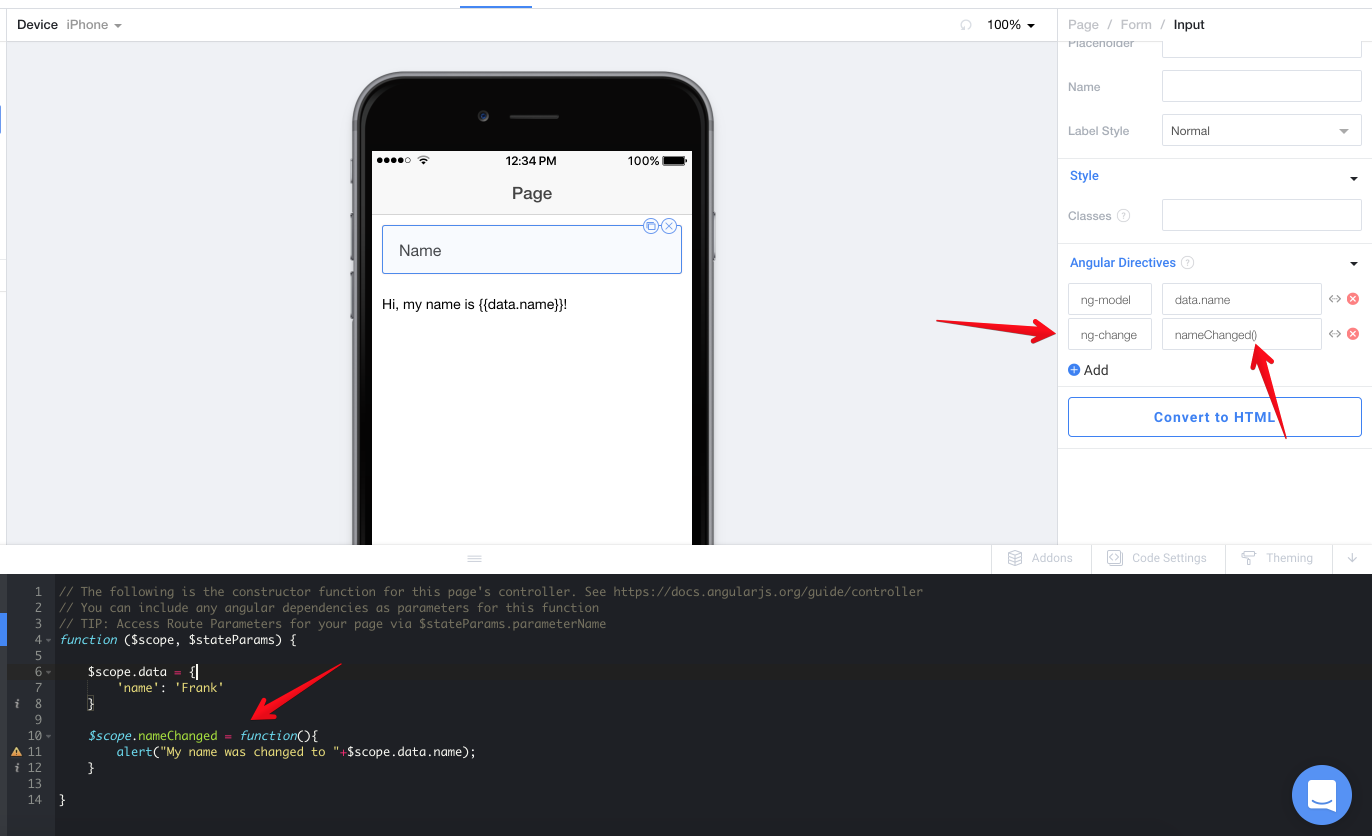
Then we get a nice little alert. 🙃

Repeating something with ng-repeat
This is one of the most commonly used directives with things like Lists that you may want to populate dynamically with data. I recommend checking out Using APIs with $http Part 2 to see a full tutorial on working with lists and ng-repeat but here's a quick example.
$scope.items = [{id: 1}, {id: 2}, {id: 3}, {id: 4}, {id: 5}];
After setting up some data on $scope that we can iterate through, we can set up our ng-repeat: item in items. This will then allow us to use {{item.id}} in our List Item as well so we can set the line to dynamic content.
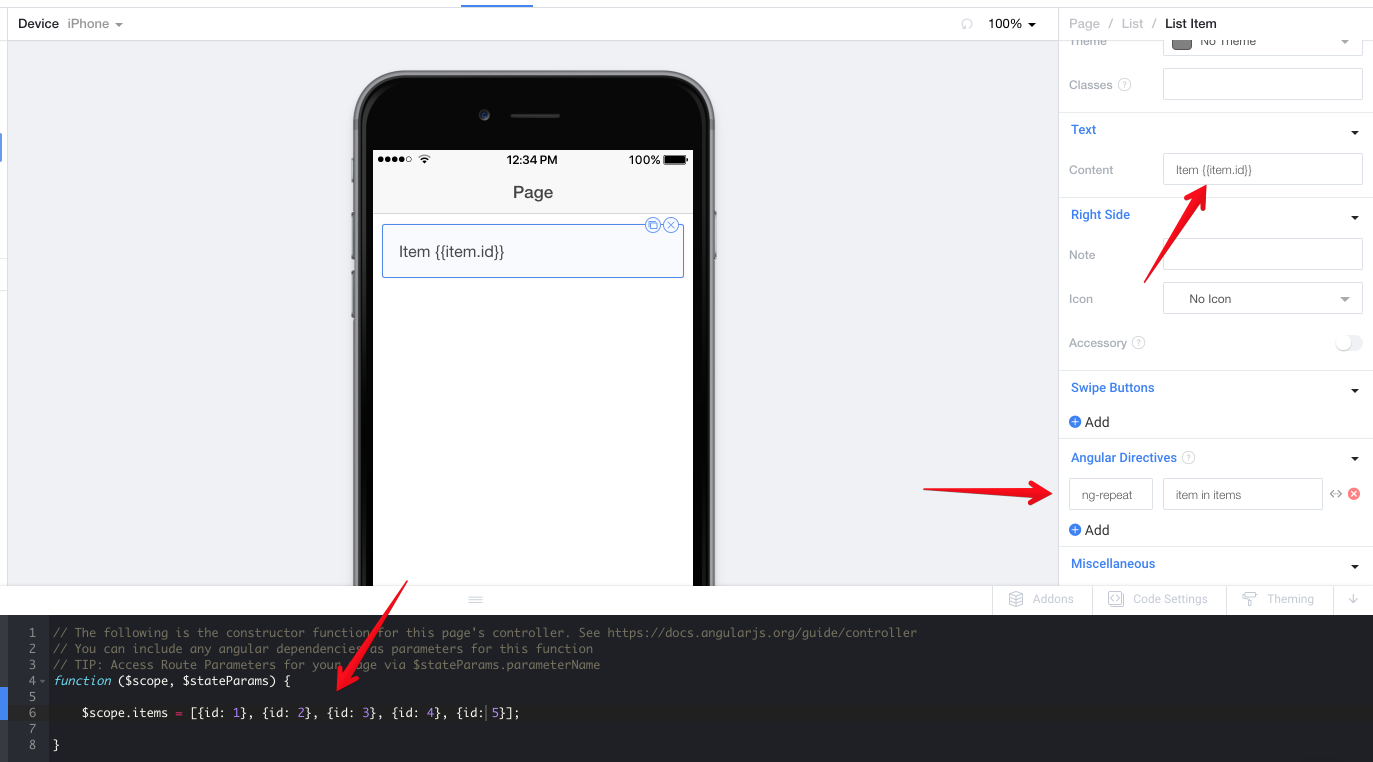
This results in the List Item being duplicated 5 times, with the ID being placed in the text of each List Item:
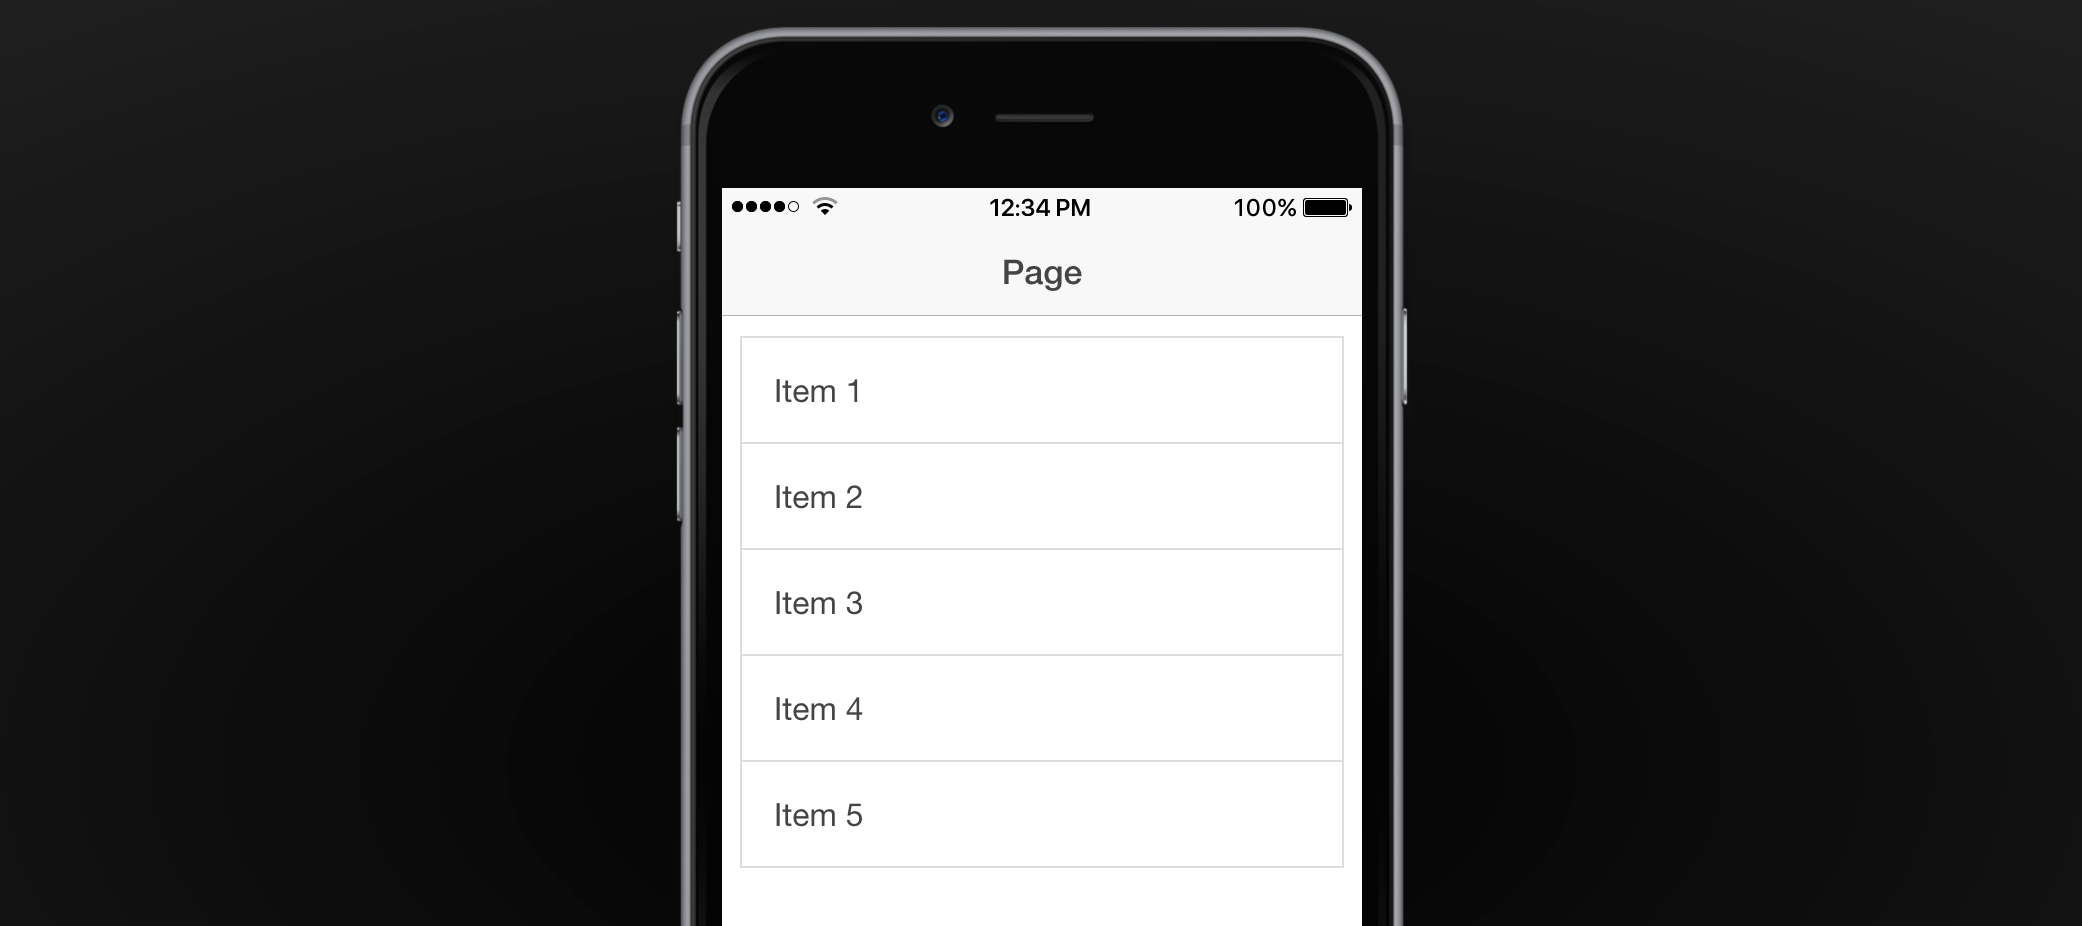
Sometimes you'll also want to control the ordering of your items. In this case you want to add a Filter to your ng-repeat. For instance, to reverse the order of this list of items you would set ng-repeat: item in items | orderBy: '-id'.
Add Click Handlers with ng-click
One of the most common directives you'll be using to kick off your code is ng-click. It allows you to call a function whenever one of our components is clicked.
Adding Click Handlers to Header Buttons
If you'd like to add an
ng-clickto a Header Button, you'll have to move the directive to the right HTML tag. For more information on how to specifically use Buttons in Headers, check out our Buttons in Headers documentation.
If we set up a simple $scope function to call off a JavaScript alert like so:
$scope.buttonClick = function(){
	alert("I've been clicked!");
}
Then we can set ng-click: buttonClick() yet again remembering to include the () so that it actually calls the function.
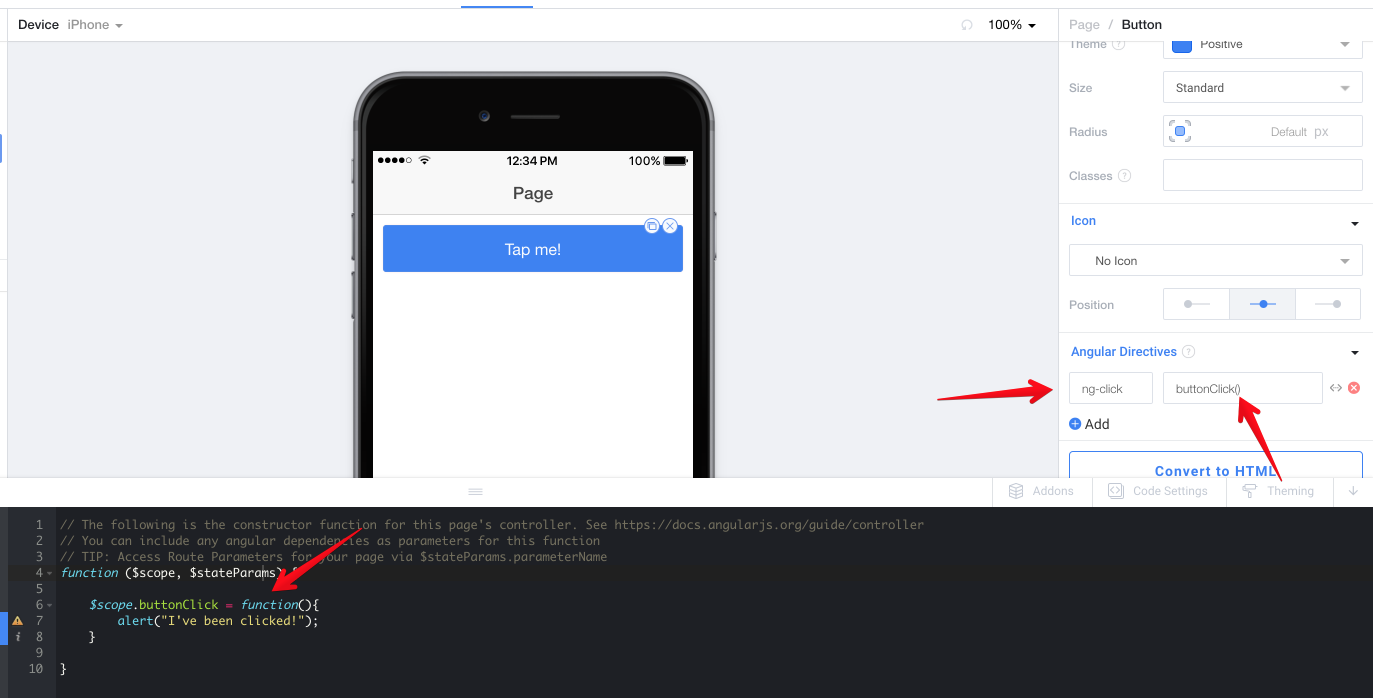
That results in our beautiful alert being shown!

Showing and Hiding with ng-show and ng-hide
Sometimes you want to show or hide a component based on whether or not a $scope variable is true or false (or a JavaScript statement equates to true/false). To do that you're going to use either the ng-show or ng-hide directives.
These directives each function exactly the same way, they just reverse the outcome. For instance a value of true on ng-show will show the component, but a value of true on ng-hide will hide the component.
Check out the Toggling Content Weekly Workshop
For a real world use case that shows off
ng-show, check out our Toggling Content Weekly Workshop which uses a Button Bar to show off 3 different sets of content based on which button is pressed.
Let's set up a simple example that uses this controller code:
$scope.showPicture = true;
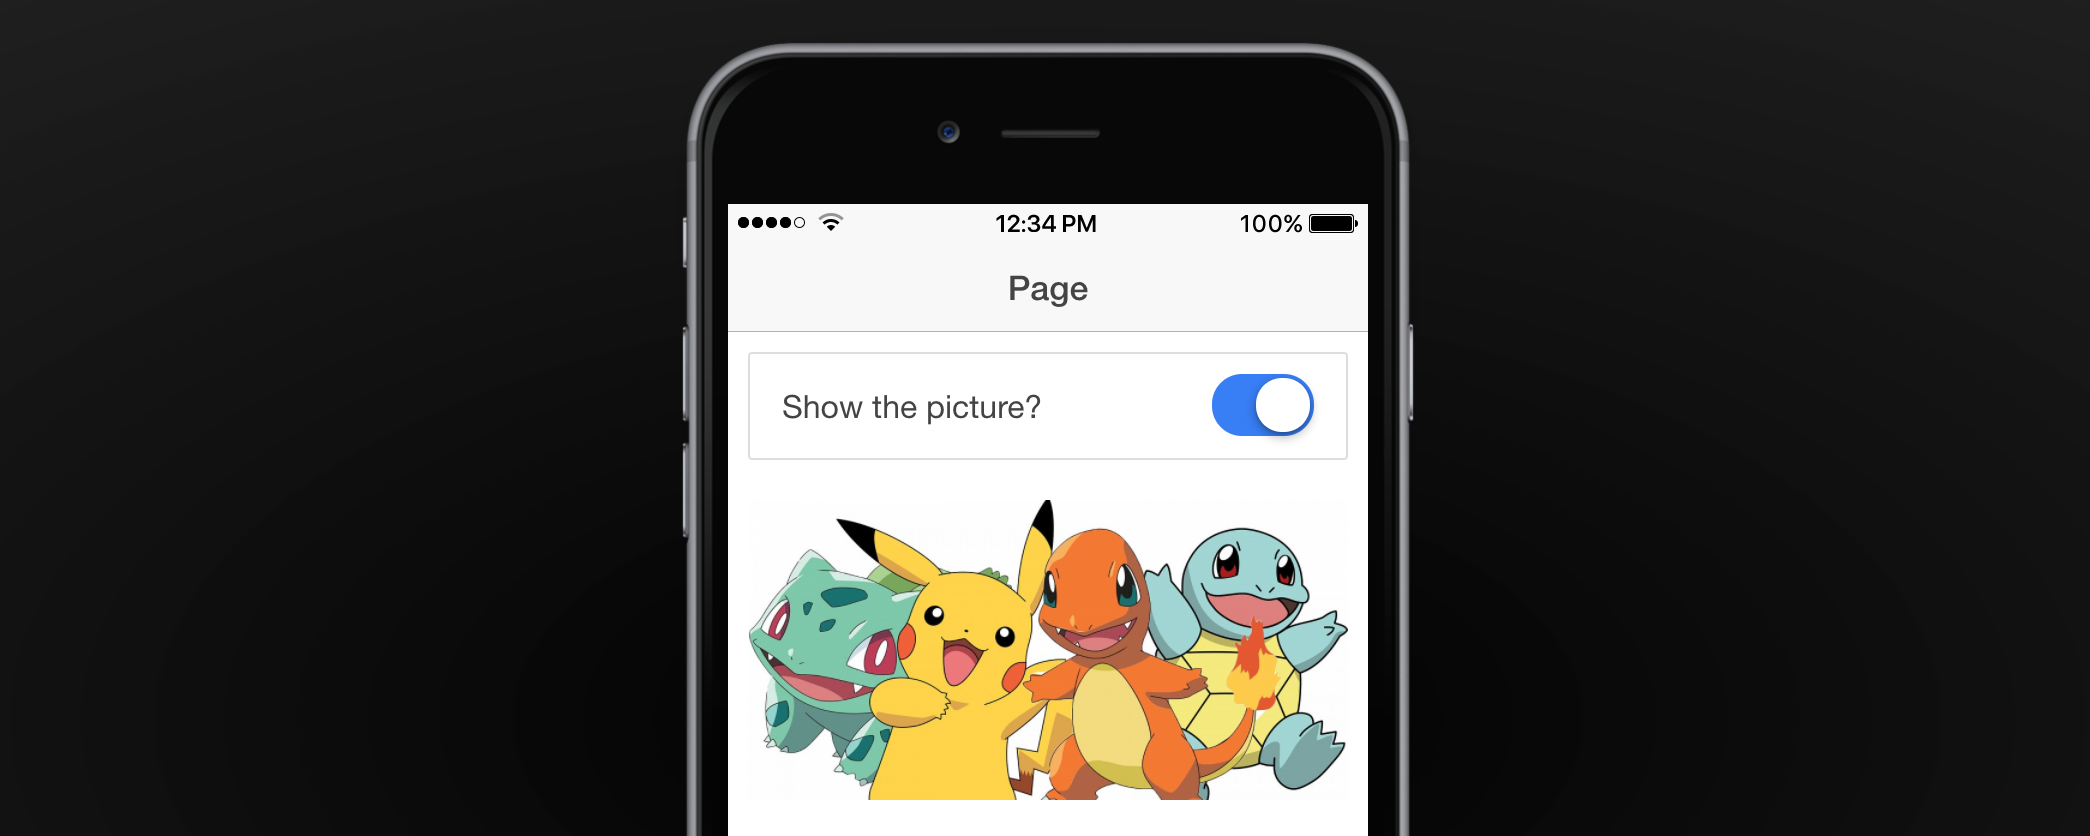
We will then set up a Toggle with ng-model so that we can change this variable while viewing our app.
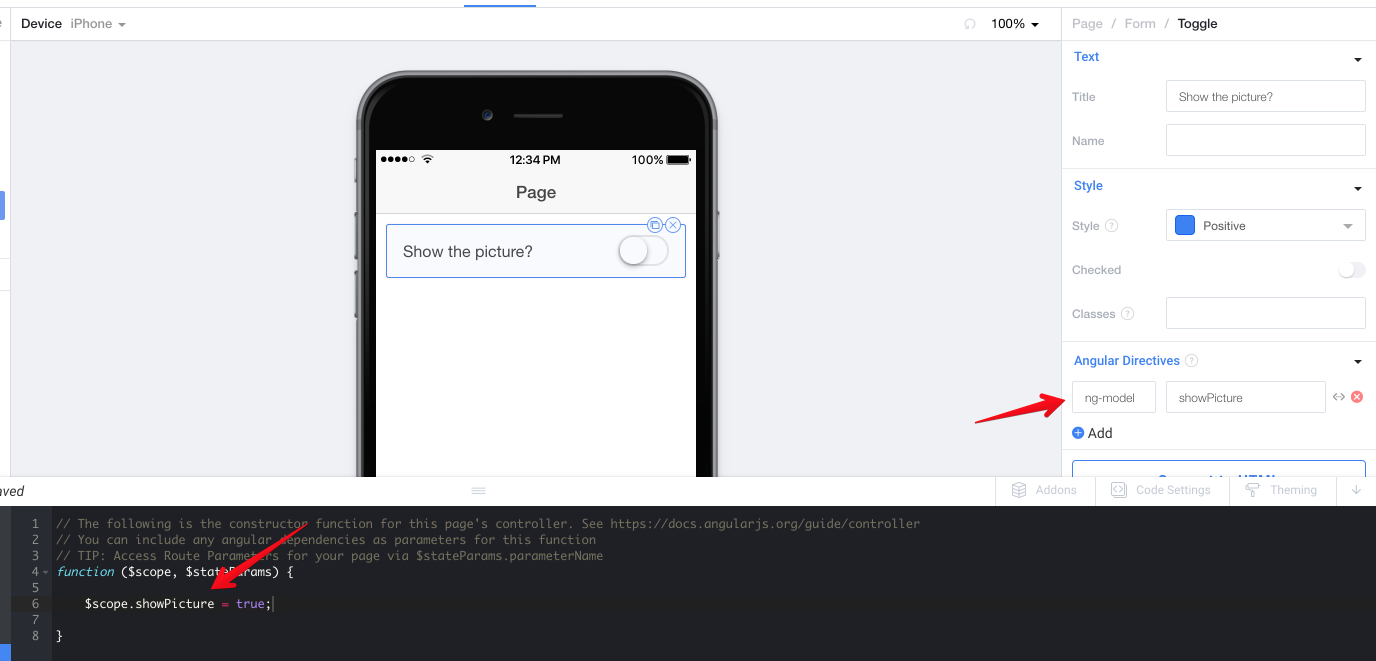
After that we will add our Image component with an ng-show value of showPicture.
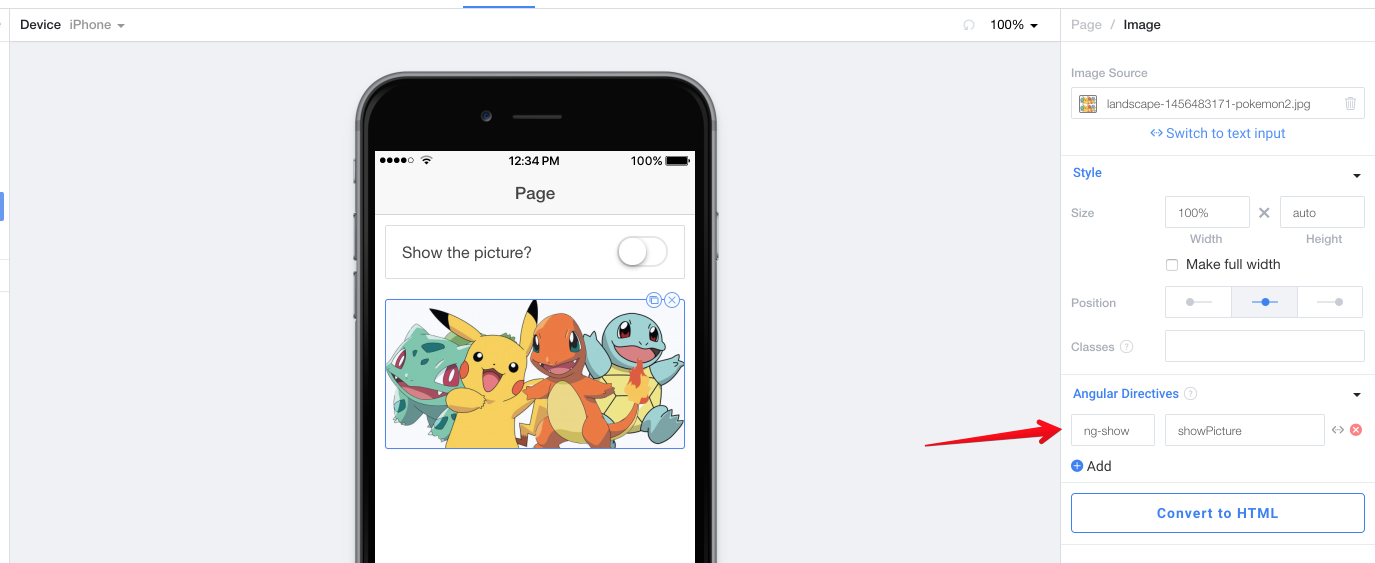
After that when we use the toggle, we'll see our image appear and disappear!
Using ng-if to prevent rendering
Note that the
ng-ifdirective works the exact same asng-showexcept that the Component or HTML will not actually be rendered at all unless the value equates to true. This is useful for things where child components or directives absolutely require data to be set before they render.
ng-showandng-hidewill actually render content regardless, it will just set CSSdisplay:none;on the element to hide it when applicable.
Conditional styling with ng-class and ng-style
Another thing you may want to do is dynamically style something based on some data. There are two primary ways to do this. One is adding the ng-class directive which can add one or more CSS classes to a component. The other is ng-style which can set a CSS property dynamically.
Both of these directives actually have JavaScript objects as values, allowing you to set multiple classes or CSS properties with one directive.
Let's start out by setting some variables in our Controller:
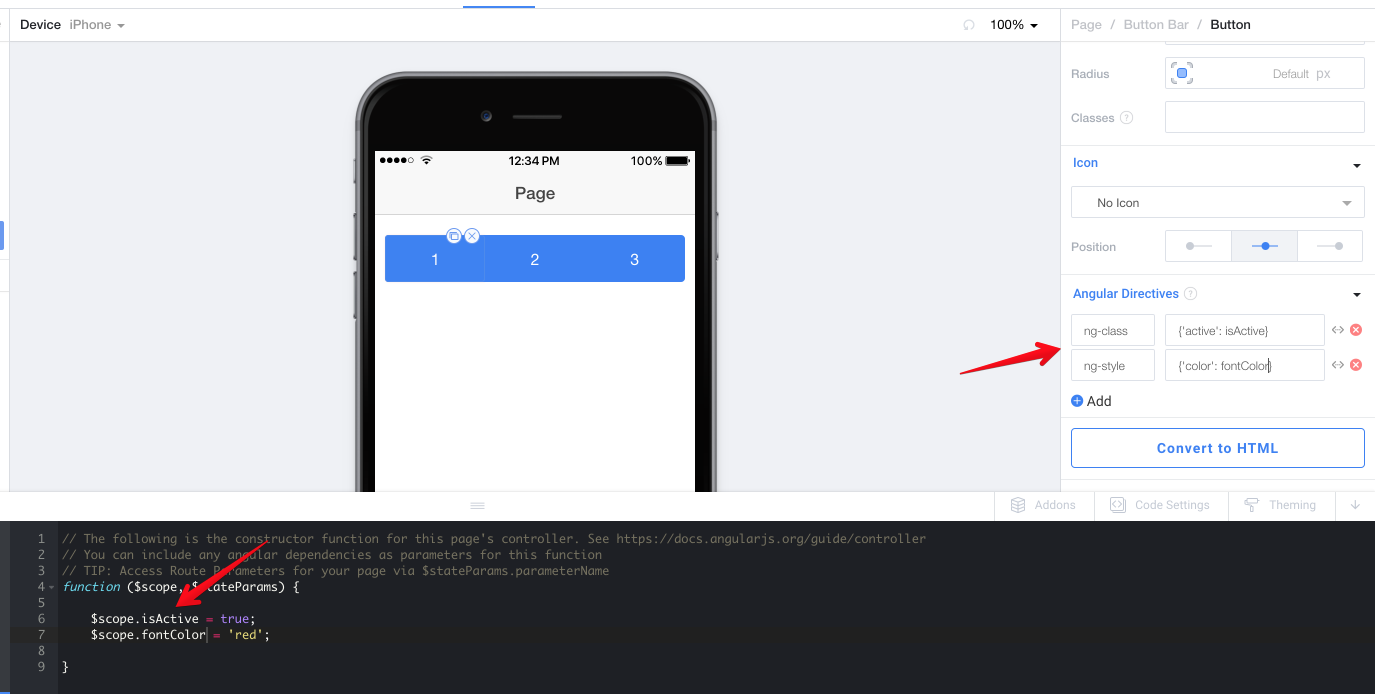
$scope.isActive = true;
$scope.fontColor = 'red';
Then we're going to set up two directives on a Button in a Button Bar component.
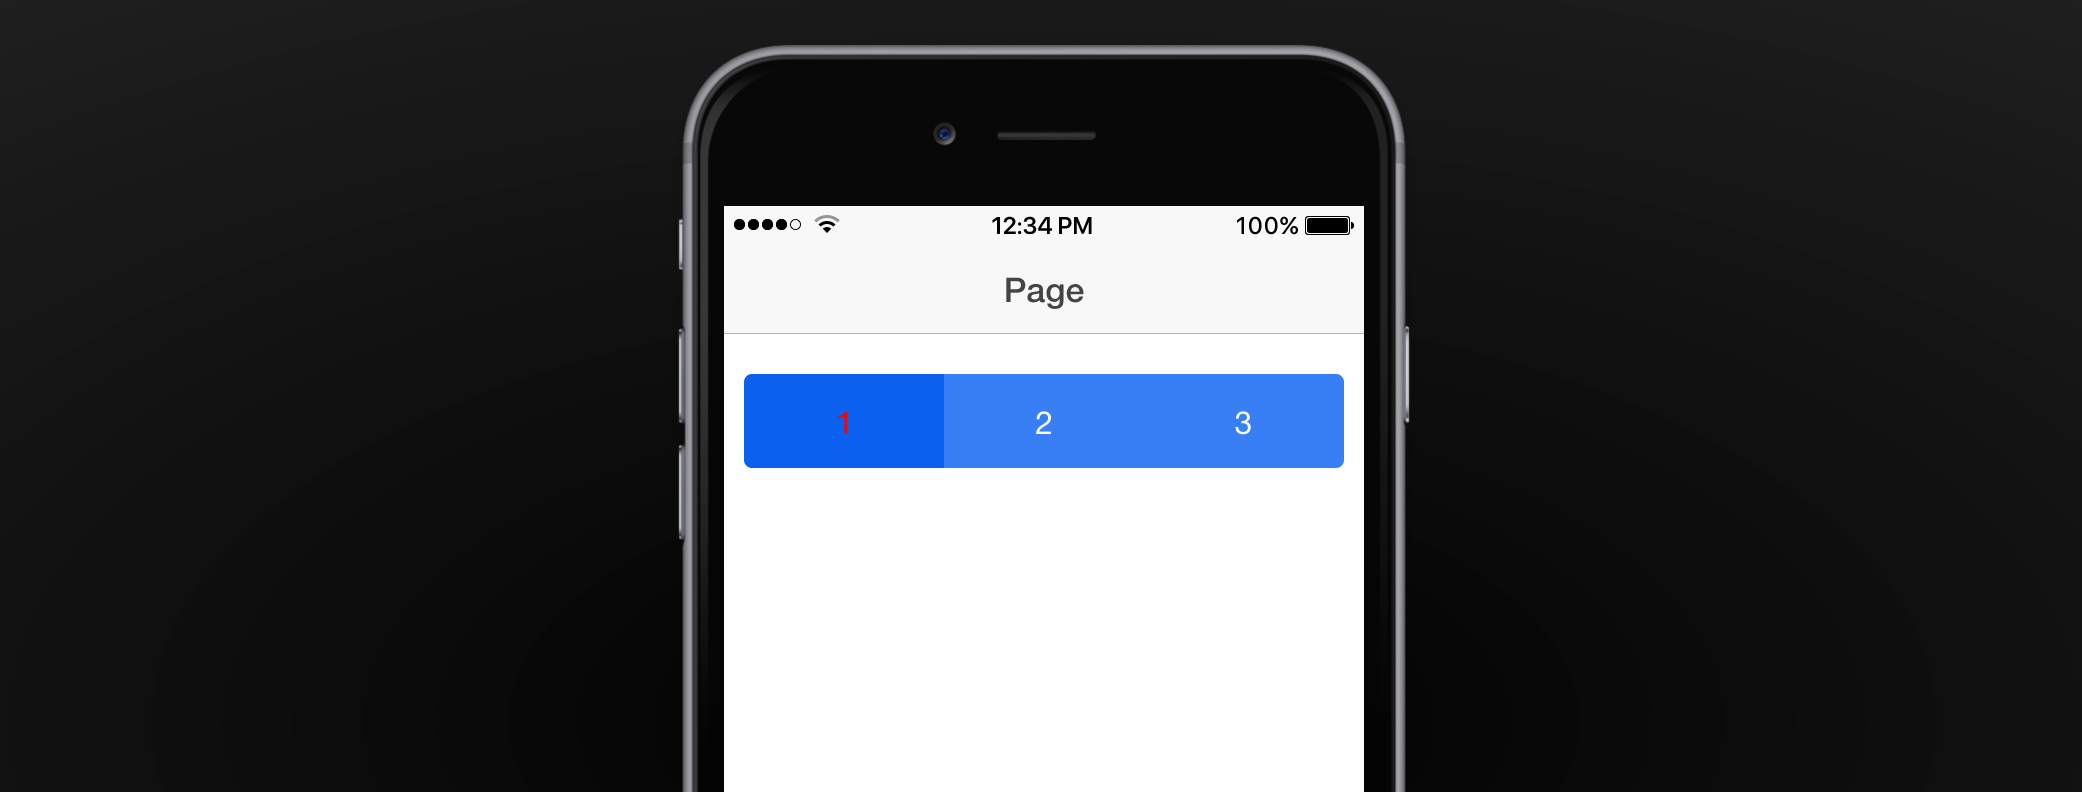
The first is going to be ng-class: {'active': isActive}. In the object, each Key is going to be the class you're adding, and each Value is going to be a true/false statement on whether or not that class is going to be added.
Then we're going to set ng-style: {'color': fontColor} which is going to set the color CSS property to the value of $scope.fontColor.
Now when we preview, we can see that the Ionic button active style has been set, and the font color of the button has been set to red!
Updated less than a minute ago
